---
title: Address Autocomplete | PostGrid
description: Step-by-step guide to adding PostGrid address autocomplete to a webpage using data attributes, script tags, country filters, and callbacks.
---
The best way to make sure that users are giving correct address details is to implement some form of autocomplete.
In this guide, we will be walking through a quick setup for getting autocomplete going with your webpage.
## Setting up our Autocomplete
In this quick start guide, we will build a functional autocomplete directly from scratch into a very a simple webpage.
You may follow the headers below to navigate the steps of this process.
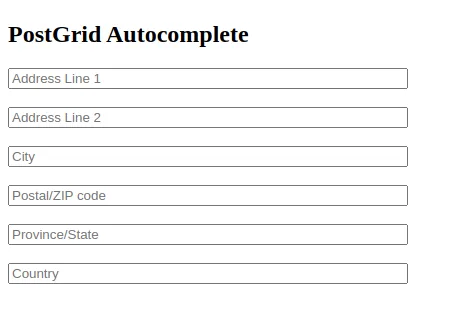
Let’s start with a new HTML file `index.html`.
Into this file, let’s insert a very basic form to receive input for the main address line, the second address line, the city, the postal/ZIP code, the state/province, and the country.
```
```
## Getting your API Key
Autocomplete with PostGrid is super quick to get going with and the first thing we will need is our API key.
To access this, you will first want to head over to your dashboard and navigate to the developers sections.\
From here, you may either grab an existing key or create a new one.
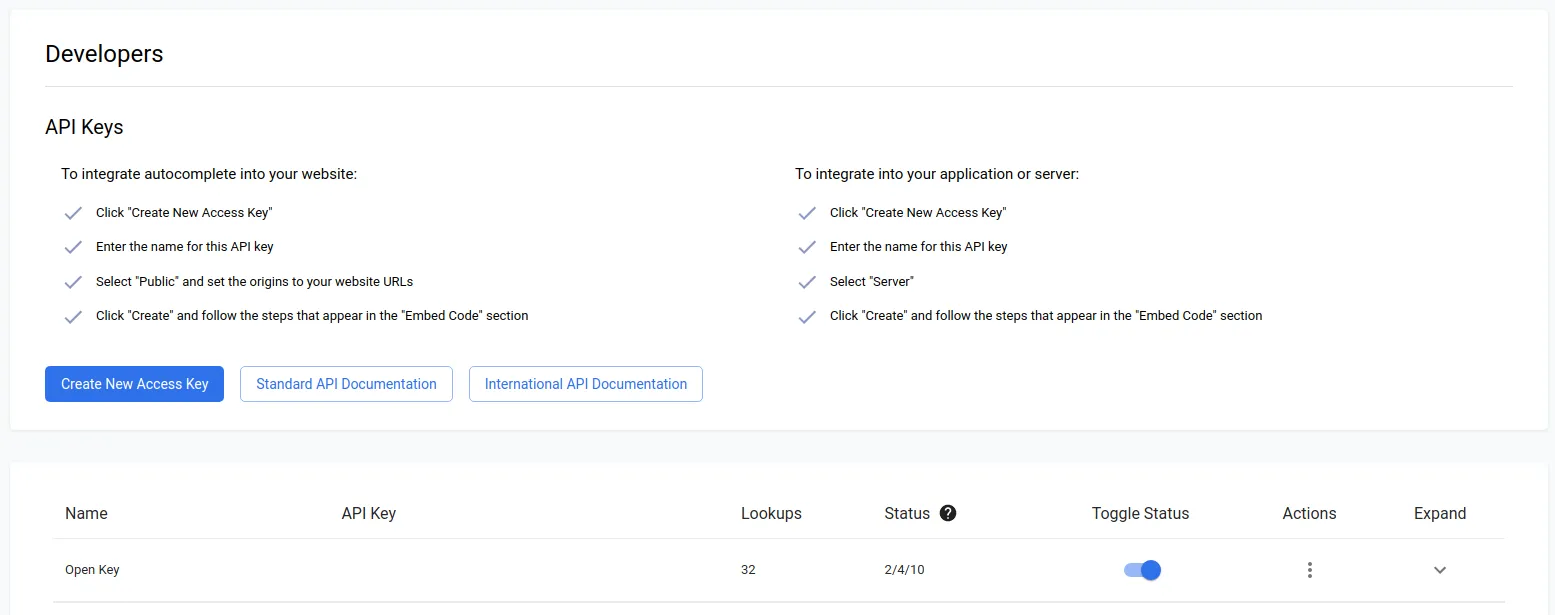
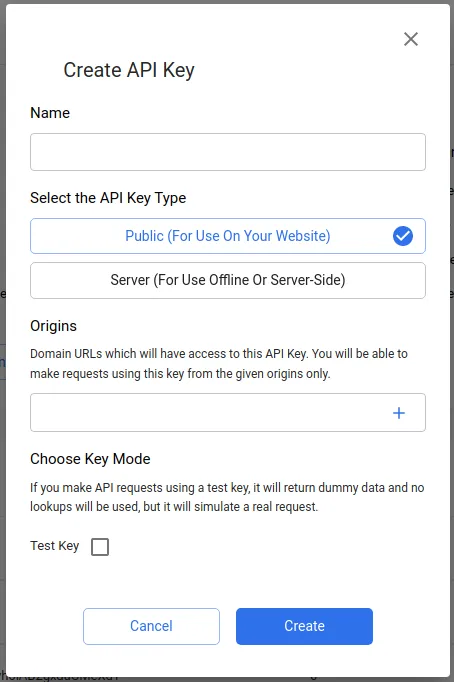
Creating a new access key, we see a few options and importantly whether or not this API key will be for public use or to be used on your own server.
With autocomplete to go directly onto your webpage, you will likely want a public key and to add any origins you may include autocomplete on. However, since we will be testing on a local file, we will need a server key just for testing purposes.
For clarity, the only differences between a public key and a server key is really just that public keys will only work on certain origins and are prefixed by ‘live\_pk’ while server key will work everywhere and are prefixed by ‘live\_sk’.
Also, you may create a test key which does not consume any lookups but only returns dummy data.\
Test keys will be prefixed by ‘test’ instead of ‘live’ as well.\
Since we only get dummy data back, I’ll be using a live key for this quick start guide.
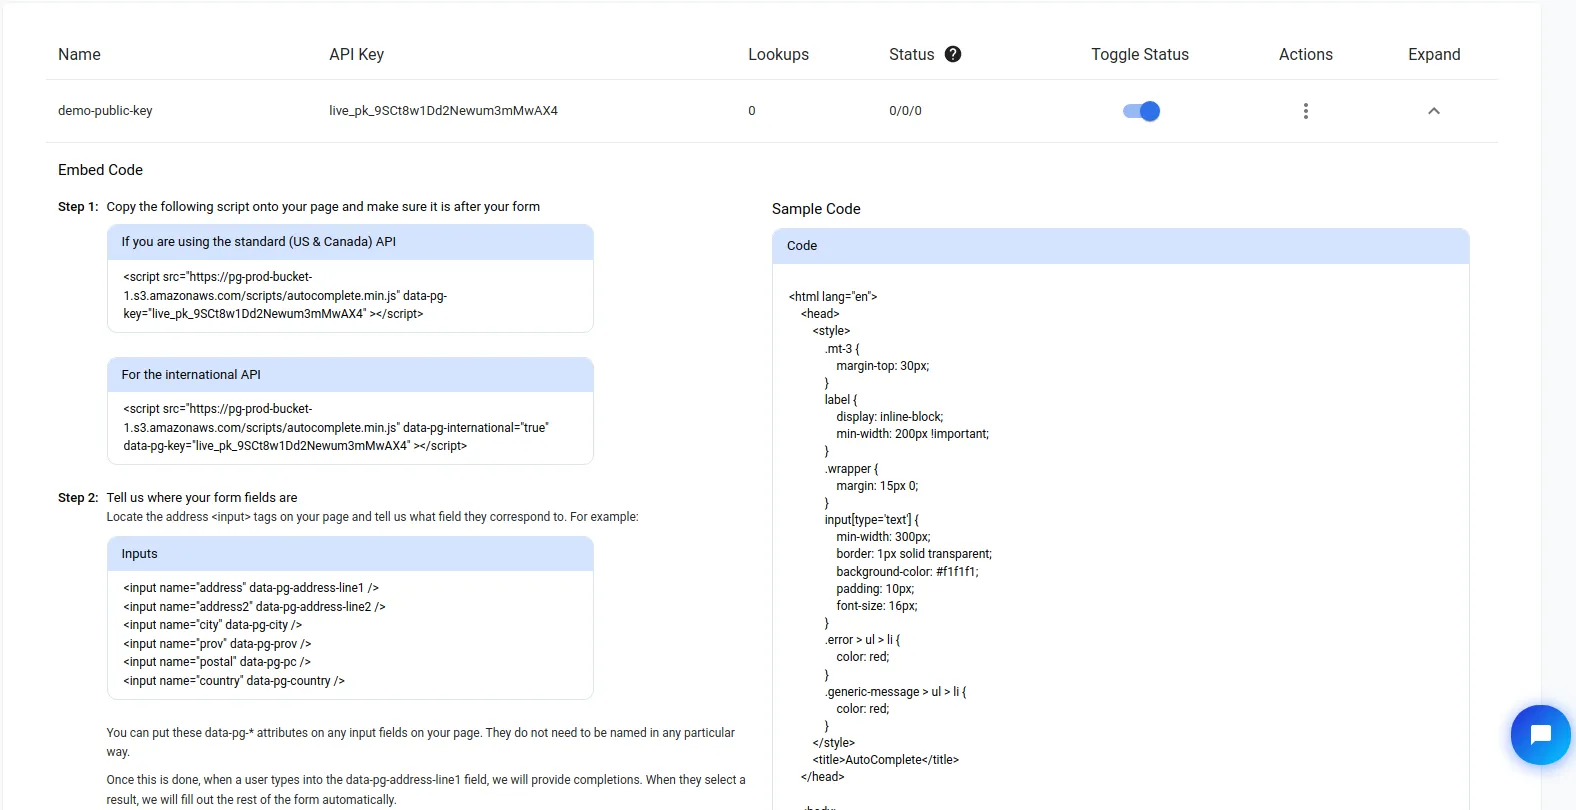
Once we have our key, we actually find a quick step-by-step for setting up our autocomplete as well as some sample code.
For this guide, we will be using the data tags and script available in these steps for how we can quickly get going with autocomplete without too much hassle.
## Adding Autocomplete
From here, it isn’t too difficult to now add autocomplete. We will start by adding to the bottom of our document the following script tag
```
```
being sure to add in the API key grabbed from the dashboard.
Next, following the outlined steps, we can add in the appropriate data tags to our form, careful not to forget `data-pg-verify` to our form tag.
```
```
Already, we are able to test out our autocomplete by typing in to our “Address Line 1” field.
As users type into the first line, you can find a list of addresses matching the supplied partial address.
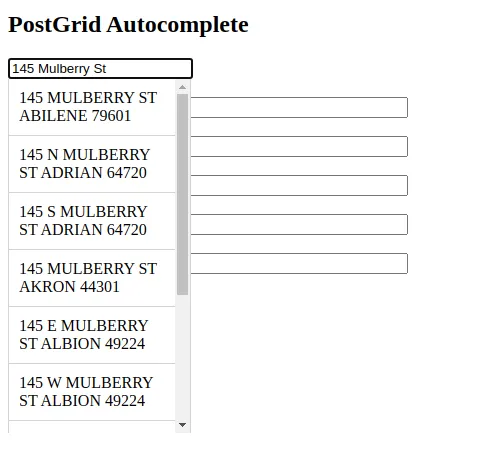
Once users select one of the addresses in the list, the other fields are automatically filled out, and it is this action which consumes a lookup and not the typing.
## Verifying Before Submission
One limitation to autocomplete is often that we wish to allow users to continue to change the address after selection. This is why PostGrid’s autocomplete if often paired up with our address verification functionality.\
To enable this functionality, all we must do is add a submit button to the end of our form and the address details from the form will automatically be verified and corrected when applicable.
```
```
If you would like to skip this automatic address verification, you can add the attribute `data-pg-skip-verification="false"` to the form tag.
When verification is enabled, you will also find that the page will only refresh when an address is marked as `verified`, so it will be important to let users know any corrections they must add.
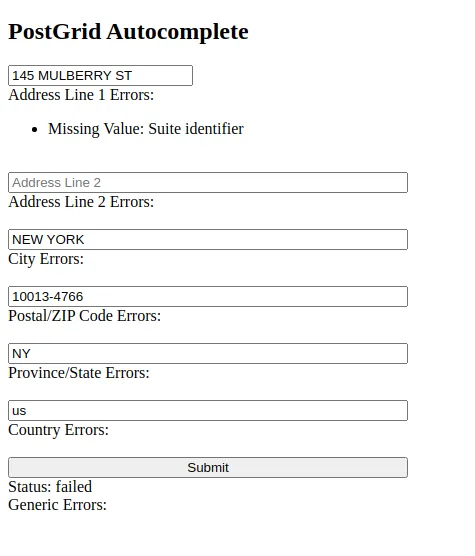
## Feedback on Verification
On top of just adding any corrections, you can also add fields to provide the status of the verification as well as any applicable error messages.
Let’s start by adding a generic error message field to the end as well as the status of the verification.\
To the end of our form, let’s add
```
Status:
Generic Errors:
```
Next, let’s add in error message for any other field we would like.
For instance, I can easily add error messages for address line one with the following
```
Address Line 1 Errors:
```
which would, for instance, allow us to let users know if a unit number is missing.
## Country Filters and International Autocomplete
With some basic functionality going, let’s discuss how we can customize autocomplete for the best results.\
The first of these customizations is which country we would like to filter by.
With the options currently in our index file, we should be receiving autocomplete information for US and Canadian addresses as part of the standard verification product.
To determine which of these countries we would like to verify between, say limiting to only Canadian addresses, we can set the `data-pg-country-filter` attribute in our script tag as follows
```
```
While it is useful to narrow between the countries supported on our standard product, you may have users coming from all around the world. For this, you will need to enable international address verification.
Once your account has some lookups for international verification (all users start with 50 test lookups), you can enable this into your autocomplete form by adding adding the attribute `data-pg-international` to your script tag and setting it to true.
```
```
With access now to over 200 countries, you may set the value of `data-pg-country-filter` to any valid country code to narrow results how you would like.
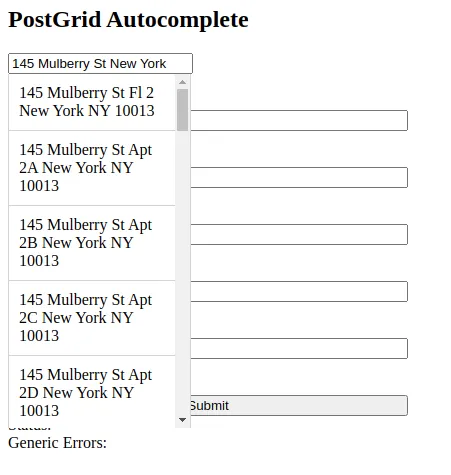
Also with our international autocomplete is enhanced unit detection, allowing users to select their unit after they have located their primary address.
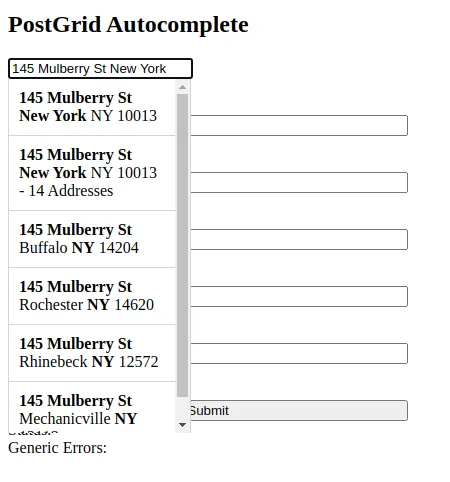
Selecting the hint for the 14 addresses at 145 Mulberry St, we obtain a full list of possible unit numbers to choose from.
## Additional Options
On top of the basic filters above, there are a number of options you may set by adding certain ‘true’ or ‘false’ attributes to your script tag. The default for each is “false” if left unspecified.
### data-pg-full-autocomplete
This attribute applies only to international autocomplete and enables users to see more advanced address details instead of the normal previews when selecting the address.
### data-pg-full-address-line1
Set this option as true to place the entire address into line 1 upon completing an address.
### data-pg-use-province-codes
This setting is for use of province codes when using the international verification product. Set this to true to ensure that provinces and states come back in initialized form (e.g. ‘QC’ for Quebec).
## Callbacks
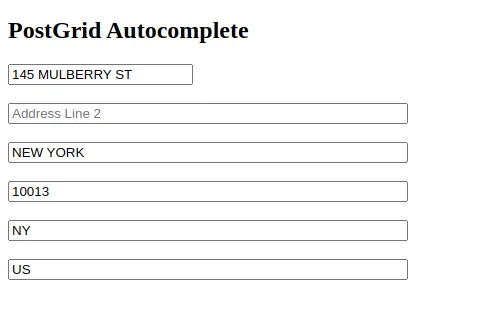
For some additional actions to be used upon users completing an address, you may also register a callback. Callback functions consume the address as a parameter, with the below being an example for completing our 145 Mulberry Address example from above.
```
{
"address": {
"address": "145 MULBERRY ST",
"city": "NEW YORK",
"country": "US",
"pc": "10013",
"prov": "NY"
},
"errors": {}
}
```
For international verification, selecting the unit “Ph D”, we have obtain a different result.
```
{
"city": "New York",
"country": "United States",
"countryCode": "US",
"formattedAddress": "145 Mulberry St Ph D\nNEW YORK NY 10013-5230\nUNITED STATES",
"line1": "145 Mulberry St Ph D",
"postalOrZip": "10013-5230",
"provinceCode": "NY",
"provinceOrState": "New York"
}
```
These can be seen easily by registering a basic logging callback by adding the following script to the body of our code.
```
```
The function `registerPostGridAddressCompletedCallback` will return a callback index which can then be deregistered by providing this index to the function `unregisterPostGridAddressCompletedCallback`, much in the same way that you can use `setTimeout` and `clearTimeout` in JavaScript.
You may set as many callback functions as needed to respond to the user selected completion.
## Conclusion
With this, you have enough information to get going with a simple implementation of PostGrid’s autocomplete feature.
From here, you can use the script attached to this document and the data tags in order to get going with a new webpage or attached to your own webpage. Add styles, callback functions, and other layers you wish to use this data with for near limitless implementation possibilities.
For more details on autocomplete, and how to work directly with our API, see our full documentation [here](https://avdocs.postgrid.com) for standard autocomplete and [here](https://documenter.getpostman.com/view/13040277/TzRLkqBB) for international autocomplete.
[API Reference (Standard Address Autocomplete)](/api/index.md)
[API Reference (International Address Autocomplete)](/api/index.md)